My Vim IDE setup for Go.
I like to claim I’m a vi person. The time I’ve spent to learn how to work with this little beast is one of the best ROI decisions I’ve made as a programmer. But every now and then, people say “Well, how the hell do you work with such an archaic setup??! you’re missing on 30 years of IDE advancements, get on with the times!!!”.
Personally I like to keep my vi/vim setup nice and minimal like it’s 1999, and don’t really use plugins. When you’re hopping between servers all day long, it’s the sane thing to do.
But here’s something I wanted to show you. How to use vim as a fully-fledged IDE for developing in Golang and keep your lighting fast workflow, without missing out on any niceties.
First things first, here’s how the result looks. I promise, this is not one of these “unix-porn”, fantastical but unusable setups you see on the internet. It is something you can work in on a daily basis, and something that you can set up in less than 30 minutes.
Convinced? Let’s go!
There are four basic components I’m using here, you can add/modify/remove as you see fit. Each one of these is a separate deep subject of its own, but I’ll stick to the very basics, just so you can get productive ASAP.
These are
- vim-go for all your Go needs
- NERDTree as a handy file explorer
- vim-airline for eye candy.
- vim-fugitive as a seriously awesome git wrapper
Let’s check them out!
Quick Note
For reference, I’ll be using Vim 8.1. Vim8 added native support for packages.
Vim has an expanding, awesome plugin ecosystem, but it can be complicated for beginners, as it’s dominated by third-party package tools, which include Pathogen, Vundle, vim-plug and what have you.
Vim 8 means that you can load plugins by just copy/pasting their contents into your ~/.vim directory! Installing and removing them is just a git clone and rm -r away, and updating them is just an issue of git pulling the latest releases! Thanks Bran! You can learn more about this awesome new feature using :h packages.
After finishing up the installations of your chosen plugins make sure to run :helptags ALL to automatically generate help tags for each one of them.
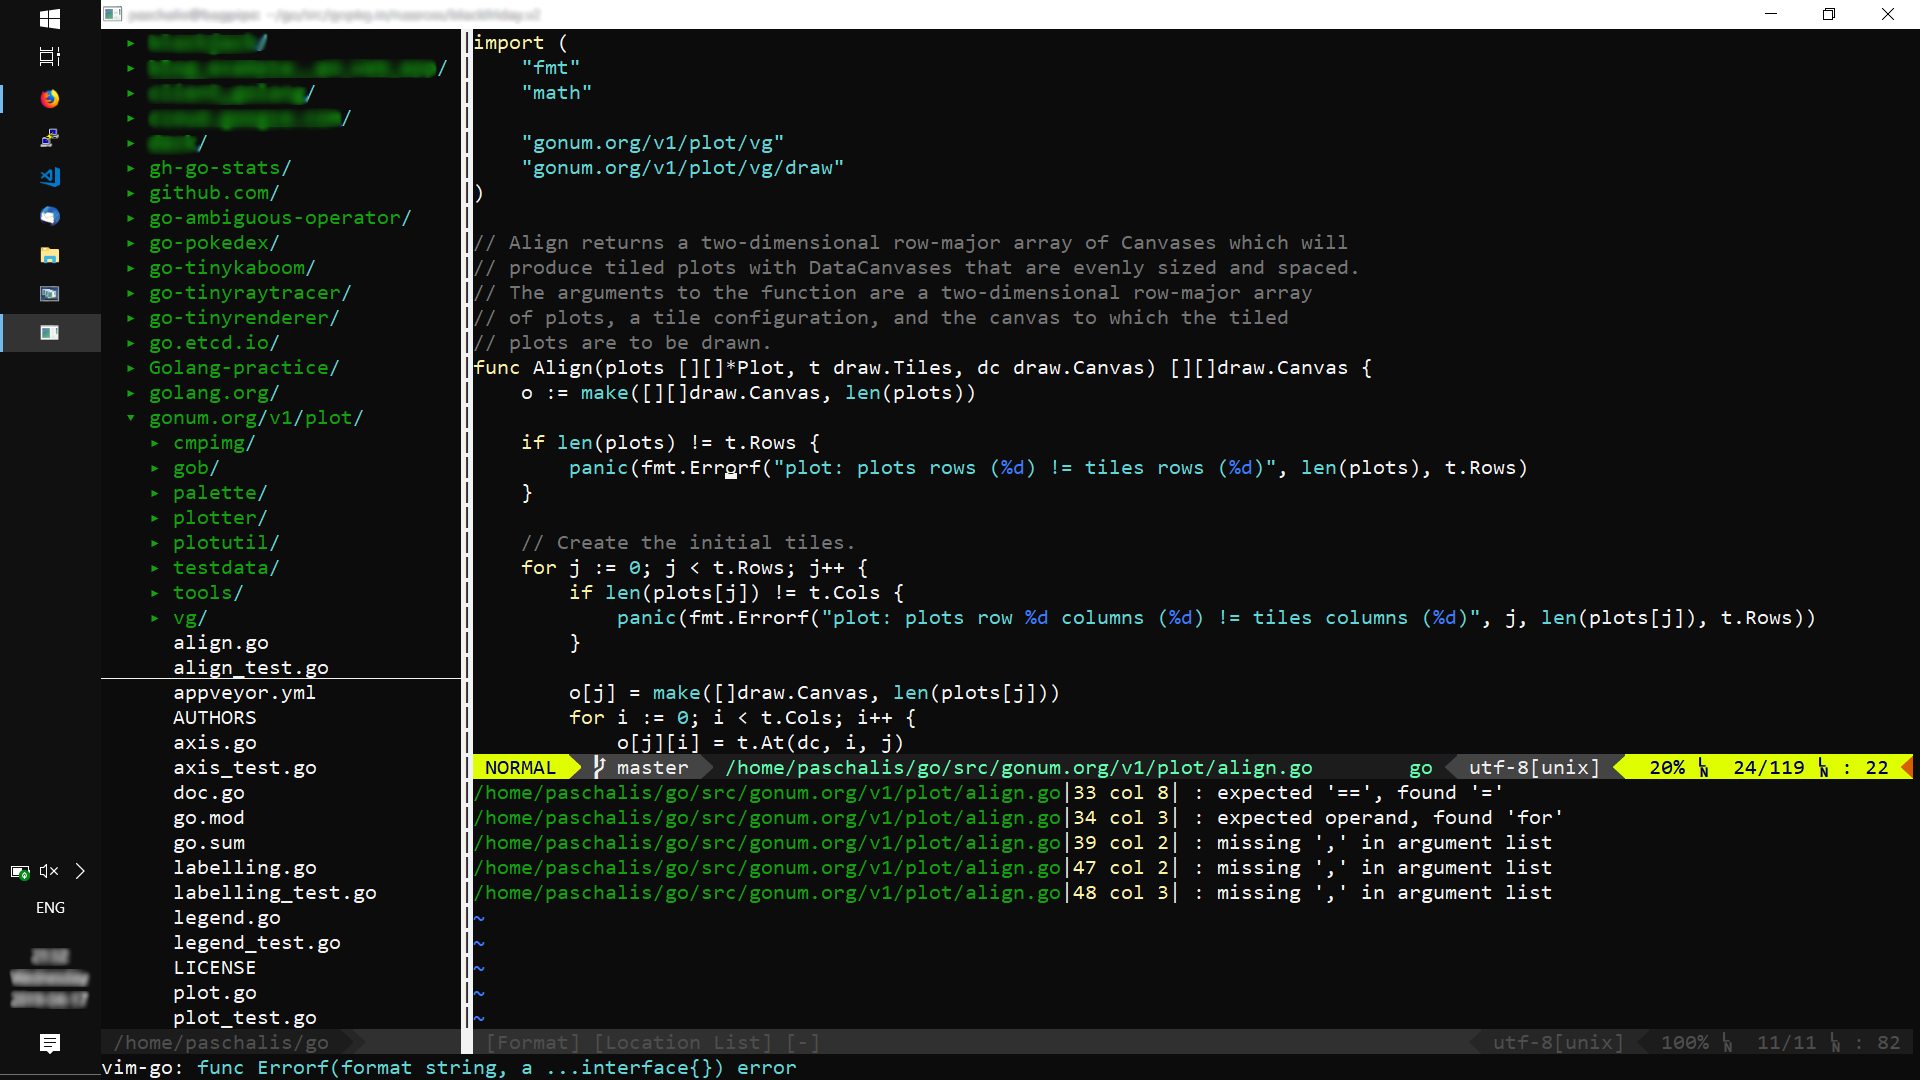
vim-go
The magic sauce of the setup is vim-go.
As I mentioned, I don’t particularly care about vim plugins and mostly use it vanilla, but if I’m working with Go, I make an exception for this one.
It does almost everything your IDE supports, but pre-baked into your vim workflow!
- Compile/Run/Install your Go project
- Run
gofmtandgoimportson save. - Jump to symbols or functions definitions
- Automatic variable type and function signature info
- Peek at documentation
- Run your test suite whole, or in parts
- Autocomplete
- Checking coverage
- Managing Imports
- Refactor safely
- Code Linting
In many cases, the commands might open up a “quickfix window” as to raise errors, quickly provide definitions, or report on test results. You can use Ctrl-WW or Ctrl-W + ArrowKey to cycle between your code and this extra window.
Installing / Removing vim-go
The easiest way to install vim-go if you’re using Vim >=8, is to directly clone the repo on your home directory, like
git clone https://github.com/fatih/vim-go.git ~/.vim/pack/plugins/start/vim-go
To remove the vim-go plugin, you can just
rm -r ~/.vim/pack/plugins/start/vim-go
and you’re all set!
To enable it, you only need to add filetype plugin indent on to your ~/.vimrc. I suggest you also add set backspace=indent,eol,start in another line, just in case your backspace returns to old-school/hardcore vim mode, so it keeps working like for most other people.
After installing and enabling the plugin, open up vim and run :GoInstallBinaries so that the tool checks $GOPATH and go gets required binaries for godoc, gopls etc.
Using vim-go.
Without further ado, here’s a handy reference table of how to achieve all this and more! It’s pretty useful as a cheatsheet for the first times you’ll be using your new “IDE”.
Cheatsheet
:GoRun :GoBuild :GoInstall

:GoDef          # goto definition of object under cursor
gd              # also has the same effect
Ctrl-O / Ctrl-I # hop back to your source file/return to definition

:GoDoc          # opens up a side window for quick documentationn
K               # also has the same effect


:GoTest         # run every *_test.go file and report results
:GoTestFunc     # or just test the function under your cursor
:GoCoverage     # check your test coverage
:GoAlternate	# switch bewteen your test case and implementation

:GoImport       # manage and name your imports
:GoImportAs
:GoDrop

:GoRename       # precise renaming of identifiers

:GoLint         # lint your code
:GoVer
:GoErrCheck

:GoAddTags      # manage your tags
:GoRemoveTags
I’ve personally added the following two directives on my .vimrc, as they’ve proved really useful.
let g:go_fmt_command = "goimports"    # Run goimports along gofmt on each save
let g:go_auto_type_info = 1           # Automatically get signature/type info for object under cursor
Autocomplete
Completion is enabled by default via omnifunc, and supported by the gocode and gopls utilities. When you’re in INSERT mode, you may trigger it using Ctrl-X Ctrl-O.
To check if vim-go’s ftplugin/go.vim has been configured correctly for autocompletion, you can run the following command. The message below should appear
:verbose setlocal omnifunc?
omnifunc=go#complete#Complete
        Last set from ~/.vim/pack/plugins/start/vim-go/ftplugin/go.vim
If you want the autocomplete prompt to appear automatically whenever you press the dot (.), you can add the following line to your ~/.vimrc, but I personally don’t like to clutter the UI, and only call it whenever needed.
au filetype go inoremap <buffer> . .<C-x><C-o>
Documentation
The complete documentation is available on the repo, and also right there on your editor, accessible by :help vim-go. There are various other shortcuts and utilities you can put to use, so make sure to check it out.
NERDTree
Most of fancy-vim guides out there will be suggesting you try NERDTree, and they have a point.
NERDTree is a fully fledged file system explorer, which helps to visually browse your OS using a tree-style “side window”.
It allows you to quickly open files, edit directory structures, copy/rename/delete files and folders and everything you’d naturally expect from such a tool.
Installing / Removing NERDTree
Again, if you’re using Vim >=8, you can just clone the repo
git clone https://github.com/scrooloose/nerdtree.git ~/.vim/pack/dist/start/nerdtree
and start using NERDTree.
Of course, to remove it just
rm -r ~/.vim/pack/dist/start/nerdtree
Using NERDTree
The only command you need for NERDTree to help in your day-to-day workflow is :NERDTreeToggle, to open and close the side file explorer. Switch between your code and NERDTree window using Ctrl-WW (double W) or Ctrl-W + ArrowKey.
You can define a shortcut like Ctrl-G (or some other one) to get NERDTree out of the way or into focus by adding something like this in your ~/.vimrc
" NERDTree plugin specific commands
:nnoremap <C-g> :NERDTreeToggle<CR>
Above and Beyond
There’s decent documentation built-in NERDTree, by pressing ?, but even the dead simplest case of navigating using your arrow keys and pressing Enter to open files is a huge timesaver.
You could also use netrw as an alternative, as it has grown to be an awesome tool as well.
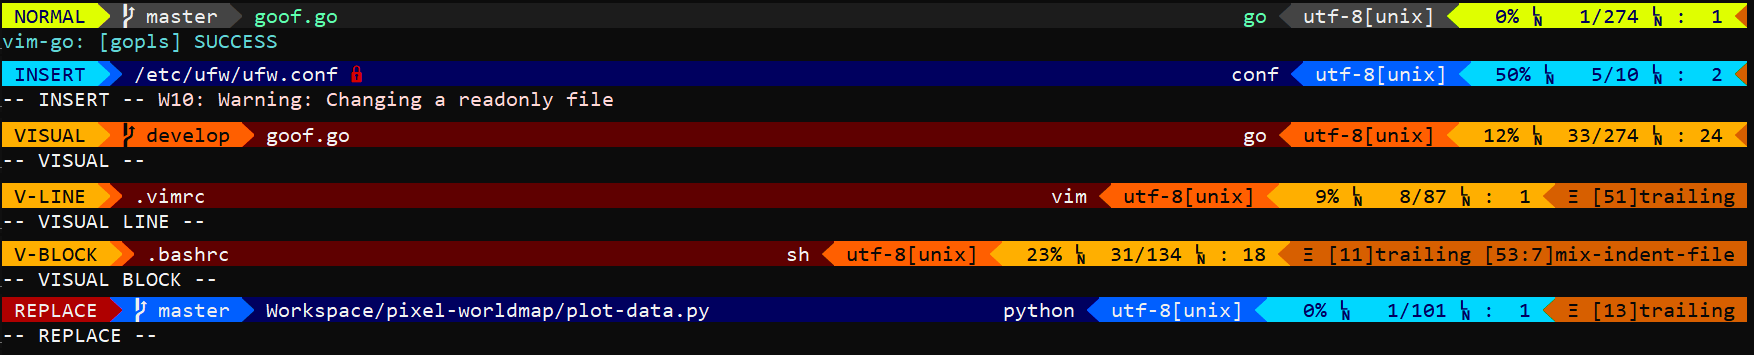
vim-airline
vim-airline is a pretty and lightweight status bar for vim. It provides not only eye candy, but also at-a-glance information such as file encoding, file type, Git status, permissions, your current position in the file, and more.
Many people love getting creative with their status line. You can even start your own. On the other hand, vim-airline takes all the fuss away and provides with sensible, pretty defaults and access to a nice modding community.
Most common questions can be answered by their great FAQ page.
Installing / Removing vim-airline
If you’re running Vim >= 8, you can install it by running
git clone https://github.com/vim-airline/vim-airline ~/.vim/pack/dist/start/vim-airline.
When you want to remove it, or freshen up with something more personal, it’s just an
rm -r ~/.vim/pack/dist/start/vim-airline
Using vim-airline
Here’s how it looks like in action, in various statuses and files on my system.
If you have any issues with missing symbols or fonts not rendering correctly, you should first check that your terminal supports UTF-8.
If the issue persists, the next step would be to download a custom font that contains the additional symbols you need (such as this one for Consolas), and/or add let g:airline_powerline_fonts = 1 to your ~/.vimrc and your issues should be resolved!

vim-fugitive
Well, one final little thing, the cherry on top. To get that sweet information about your version control system, you need vim-fugitive.

Tim Pope is the vim plugin guy. He’s the original creator of the most popular third-party package management, Pathogen, as well as the author of many of the top vim plugins.
Anyway, Tim says about his work : “fugitive.vim: A Git wrapper so awesome, it should be illegal”. And he’s mostly right.
Installing / Removing vim-fugitive
To install you can just
git clone https://github.com/tpope/vim-fugitive.git ~/.vim/pack/dist/start/vim-fugitive
and if it doesn’t suit you, just remove it with
rm -r ~/.vim/pack/dist/start/vim-fugitive
Using vim-fugitive
Without learning any commands, vim-fugitive simply provides instant info about the state of your repo, and helps keep track of where you’re working on. But also, it is a very deep plugin, an excellent and powerful complement to the command line git.
You can get started with just three basic commands, and use git without opening and closing your files all the time:
:Gstatus        # run `git status`
:Gdiff          # diff the working tree vs staged version
:Gcommit %      # commit the current file
The next step would be to check the documentation for more!
You can take a look at my personal ~/.vimrc setup, if you want to copy some ideas.
.vimrc
Here’s my ~/.vimrc in case you want to steal any ideas.
syntax on
colo pablo
" Flash screen instead of beep sound
set visualbell
" Change how vim represents characters on the screen
set encoding=utf-8
" Set the encoding of files written
set fileencoding=utf-8
autocmd Filetype python setlocal expandtab tabstop=4 shiftwidth=4 softtabstop=4
autocmd Filetype go setlocal tabstop=4 shiftwidth=4 softtabstop=4
" ts - show existing tab with 4 spaces width
" sw - when indenting with '>', use 4 spaces width
" sts - control <tab> and <bs> keys to match tabstop
" Control all other files
set shiftwidth=4
set undofile " Maintain undo history between sessions
set undodir=~/.vim/undodir
" Hardcore mode, disable arrow keys.
"noremap <Up> <NOP>
"noremap <Down> <NOP>
"noremap <Left> <NOP>
"noremap <Right> <NOP>
filetype plugin indent on
" Allow backspace to delete indentation and inserted text
" i.e. how it works in most programs
set backspace=indent,eol,start
" indent allow backspacing over autoindent
" eol allow backspacing over line breaks (join lines)
" start allow backspacing over the start of insert; CTRL-W and CTRL-U
" stop once at the start of insert.
" go-vim plugin specific commands
" Also run `goimports` on your current file on every save
" Might be be slow on large codebases, if so, just comment it out
let g:go_fmt_command = "goimports"
" Status line types/signatures.
let g:go_auto_type_info = 1
"au filetype go inoremap <buffer> . .<C-x><C-o>
" If you want to disable gofmt on save
" let g:go_fmt_autosave = 0
" NERDTree plugin specific commands
:nnoremap <C-g> :NERDTreeToggle<CR>
"autocmd vimenter * NERDTree
" air-line plugin specific commands
let g:airline_powerline_fonts = 1
if !exists('g:airline_symbols')
let g:airline_symbols = {}
endif
" unicode symbols
let g:airline_left_sep = '»'
let g:airline_left_sep = '▶'
let g:airline_right_sep = '«'
let g:airline_right_sep = '◀'
let g:airline_symbols.linenr = '␊'
let g:airline_symbols.linenr = ''
let g:airline_symbols.linenr = '¶'
let g:airline_symbols.branch = '⎇'
let g:airline_symbols.paste = 'ρ'
let g:airline_symbols.paste = 'Þ'
let g:airline_symbols.paste = '∥'
let g:airline_symbols.whitespace = 'Ξ'
" airline symbols
let g:airline_left_sep = ''
let g:airline_left_alt_sep = ''
let g:airline_right_sep = ''
let g:airline_right_alt_sep = ''
let g:airline_symbols.branch = ''
let g:airline_symbols.readonly = ''
let g:airline_symbols.linenr = ''
Startup Time
Someone will argue “You’re using vi for performance, all these plugin slow things down. Don’t be stubborn, just use a god-damned IDE”.
They may have a point in trying some other IDE, not so sure about vim slowing down though!
You can use vim --startuptime startup.log to start vim. It will list every action taken until the point where it becomes interactive for you to use, and save results on a startup.log file. The times reported there are in Milliseconds.
I tested for 20 ‘starts’ of vi, when the values should start to look like a normal distribution. It’s as easy as
for i in {1..20}; do
    vim --startuptime start$i.log;
done

find start* -exec grep STARTED {} \; | cut -d' ' -f1
The major cause of delay seemed to be the automatic opening of NERDTree. In general, the full-blown setup never takes more than 300ms to open, which is way faster than most (if not all) Desktop applications you might have tested against.
I tested the following cases, and present the results in a table below.
- Windows 10 WSL “nude” Vim (no plugins, empty .vimrc)
- CentOS 7 Virtualbox VM “nude” Vim
- Centos 7 Idle Server “nude” Vim
- Windows 10 WSL w/ Automatic startup of NERDTree disabled
- Windows 10 WSL w/ Full Plugins (hot start)
- Windows 10 WSL w/ Full Plugins (cold start)
- Windows 10 WSL w/ Full Plugins (inside Git repo)
| System                    | Median | Average | Worst  |
|---------------------------|--------|---------|--------|
| Win10 WSL "nude" vim      |  23.25 | 23.50   |  27    |
| CentOS 7 VM "nude" vim    |  33.82 | 33.83   |  36    |
| CentOS 7 Native "nude" vim|  46.49 | 49.09   |  61    |
| Win10 WSL No Auto NERDTree| 108.06 | 107.85  | 112    |
| Win10 WSL Full vim (hot)  | 194.08 | 193.64  | 254    |
| Win10 WSL Full vim (cold) | 230.61 | 231.03  | 254    |
| Win10 WSL Full vim (repo) | 252.38 | 250.99  | 276    |
Not bad at all!
Parting words
I hope you have enjoyed this post as much as I did creating it! Feel free to discuss on Reddit, send me an email or a Twitter DM for any suggestions, insights or corrections.
If you indeed decide to use this setup exlusively, you might need an afternoon or so of tinkering, but it’s up to you to decide if it’s worth your time. For me, personally, it’s both fun and provides immense utility, make of that what you will.
Finally, if you want to try some more advanced stuff, feel free to check out ale as an “ascynchronous lint engine” to provide on-the-fly syntax checking, warnings about semantic erros and other goodies, vim-delve to tie delve support into vim for debugging your Go application as well as any of the numerous plugins that provide snippet support.
Until next time!